In this post, I want to present my current home server setup, including the hardware, the virtualized infrastructure (Networks, VMs), and the services (Containers) I am running.1 The goal is to give you some inspiration and also to have some more thorough documentation for myself. While writing, I noticed some possible improvements, so there is value in the documentation process itself.
This post will be quite long as the infrastructure evolved over a prolonged period.
To avoid convoluting it unnecessarily, I will only cover the most relevant subsystems and provide docker-compose.yaml files for some services.
Physical Devices §
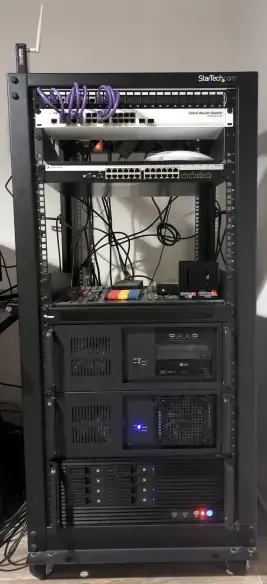
While there are many physical computers in my home, like my personal computer, numerous ESP8266 microcontrollers, and some Raspberry Pis that I use for playing music, as an alarm clock, or to control the 3D printer, the following are the most relevant to my infrastructure. Most of the devices are mounted in a 24-unit server rack. Those that can not be mounted just sit on rack shelves.
All of the devices combined draw $\approx$ 130W, depending on utilization. At the current energy price, this amounts to 30€ per Month.
Hypervisor §
Currently, I only use a single server (running Proxmox) as a virtualization platform. This server is assembled from spare consumer components left over from old PCs. It has been upgraded several times with new disks and more RAM. I packaged it into a rack-mountable chassis four units in height.
- OS: Proxmox
- RAM: 128GB DDR4
- CPU: Ryzen 7 1700 8 cores @3.2Ghz
I used to have a multi-node Proxmox cluster, but at some point, I could not rationalize the increased power consumption while having almost no benefits.
Storage I use a 128GB SSD to store the OS and another 1TB SSD to back the VM disks. Apart from this, I only recently switched to RAID-backed HDD storage for my data. Currently, I am using 40TB ZFS RAID (from 3x20TB Disks), which are available to the network via Samba. This RAID setup allows one of the three HDDs to fail without loss of data.

My rack
Router §
While it would be possible to virtualize the router, this is generally discouraged: you do not want a server reboot to also bring down your network. Also, sometimes, the hypervisor might crash, and while this is bad enough, it gets worse if the server takes down the network as well (which you might need to fix the server).
So, I decided to buy a dedicated physical computer for the router: an APU.2E4.
- OS: OPNsense
- CPU: 4 cores (AMD) @1GHz
- RAM: 4GB
- Disk: 16GB SSD
The power draw is about 6-12W.
Public Key Infrastructure OPNsense can be used to manage a Public Key Infrastructure (PKI) with a graphical user interface, which is very convenient. The PKI can issue certificates for self-hosted web services or keys for authentication.
VPN The router also runs OpenVPN. The authentication uses the PKI, so each client has its own private key, which it uses to access the VPN. Exposing only a small number of the services to the outside world helps to reduce the attack surface. All other services can still be accessed via VPN.
Switch §
I use a Mikrotik Crs326-24G-2S, a managed switch with 24x RJ45 Ports running at 1GBit/s and two additional SPF+ ports. I could not yet convince myself that it is necessary, but at some point, I want to use the SPF+ ports and upgrade my internal network to 10Gbit/s. At the moment, this would not make much sense, as throughput is usually limited by the HDDs IO.
- OS: RouterOS
This low-power and very quiet switch does not support Power over Ethernet (PoE). Therefore, I use another cheap switch with 4 RJ45 ports for PoE.
WiFi Access Point §
As WiFi AP, I use a Unify U6 Pro that allows me to run three isolated WiFi networks:
- Main WiFi: for devices I trust
- IoT WiFi: for all IoT devices (that I might not trust)
- Guest WiFi: for visitors
This access point additionally requires the Unifi-Controller software to run somewhere. Buying this particular AP might not have been the best choice from a free (as in freedom) software standpoint, but it has been working without any issues since I bought it, so there is that.
This AP needs to be powered over ethernet.
DNS & Backup §
Pi-Hole I have a Raspberry Pi 3 running PiHole as a DNS for my entire network.
This does not run inside a VM because I still want the DNS to work if the primary node goes offline.
The router is configured to use this PI as the DNS server for all requests that do not go to *.local addresses.
Backups Additionally, this Pi has a 4TB external HDD available via Samba and is set up as external storage for my Proxmox host. In regular intervals, Proxmox saves backups of VM disks in this storage. This makes it very convenient to restore a particular VM to its state of - say - yesterday in case something goes awry.
Local Backups I additionally store daily backups on the ZFS RAID.
Offsite Backups I have further backups in a remote location. These are updated in irregular intervals.
VLANS §
Virtual LANs allows you to create several virtual sub-network segments on top of a single physical LAN. For a device in a VLAN, it looks as if it was in an isolated network. The advantage of this is improved isolation: only machines in the same VLAN can communicate with each other. Other traffic has to go over the router, where you have control over the firewall.
I set up a couple of VLANs in my home network, including:
- External: Every machine exposed to the outside world is in this VLAN
- Internal: Every machine that runs services that do not have to be accessible from the outside is in this VLAN
- IoT: Everything related to home automation is in this VLAN
- Guests: Guests, who, for example, connect via the dedicated guest WiFi, will be assigned to this VLAN
Virtual Machines §
All of these machines run on the main hypervisor node. On the VMs, I run all of the services inside docker containers. From outside of a VM, some of the containers (those exposing web interfaces) are accessible via a Nginx reverse proxy. This proxy takes HTTP(s) requests and forwards them to the corresponding container, based on the Host-field of the request.
This allows me to use different subdomains, e.g., wiki.myhost.local or kiwix.myhost.local, to access different services instead of binding them to different ports on the same machine. This way, I only have to remember the subdomain for each service and not some random port number.
Internal Services §
I have a VM that runs most of my internal services and does not have to be accessible from the outside. Hardware-wise, it uses the following:
- OS: Debian 12
- CPU: 4 vCPU
- RAM: 8GB
- Storage: 32GB Thin Disk
- NIC: single VirtIO (paravirtualized) connected to Internal VLAN
Applications §
- Nginx-Proxy-Manager: HTTPs for web-services
- FreshRSS: RSS reader
- Wallabag: allows you to store websites for later reading, comes with an excellent browser plugin
- MediaWiki: basically Wikipedia, used for note-taking
- Kiwix: offline browser
- Uptime Kuma: monitors the online status of websites
- Watchtower: automatically updates docker containers when new images are available
- Telegraf: server monitoring solution
- Stirling-PDF: PDF utilities
- Unify-Controller: used to manage the WiFi AP
- Portainer: GUI for managing docker containers
- OpenWebUI: frontend for interacting with (local) LLMs
- Firefly-III: personal finance management
Nginx Proxy Manager §
The proxy manager has a wildcard certificate (*.myhost.local) signed by my internal root certificate authority so that I can connect to all of the services via HTTPs.
The proxy and all containers accessible through it share a common docker network called rproxy-network.
This has to be created externally by running:
docker network create rproxy-network
The docker-compose.yaml looks like this:
version: '3'
services:
  app:
    image: 'jc21/nginx-proxy-manager'
    container_name: proxy-manager
    restart: always
    ports:
      - '81:81'
      - '443:443'
    volumes:
      - ./data:/data
      - ./letsencrypt:/etc/letsencrypt

networks:
  default:
    external:
      name: rproxy-network
The forwarding has to be configured manually via Web UI that runs on port 81.
FreshRSS §
FreshRSS is an RSS reader. The setup with the linuxserver.io image is straight-forward:
version: '3'
services:
  freshrss:
    image: lscr.io/linuxserver/freshrss:latest
    container_name: freshrss
    hostname: freshrss
    restart: unless-stopped
    networks:
      - rproxy
    volumes:
      - ./data:/config
    environment:
      TZ: Europe/Berlin
      PUID: 1000
      PGID: 1000

networks:
  rproxy:
    external:
      name: rproxy-network
Wallabag §
Wallabag allows you to save webpages for later offline reading. There is also a browser plugin for Firefox that lets you add a website swiftly.
The setup is a bit more complex.
Note that only the main container is connected to rproxy-network.
version: '3'
services:
  wallabag:
    image: wallabag/wallabag
    container_name: wallabag
    restart: always
    networks:
      - default
      - rproxy
    environment:
      - MYSQL_ROOT_PASSWORD=xxxx
      - SYMFONY__ENV__DATABASE_DRIVER=pdo_mysql
      - SYMFONY__ENV__DATABASE_HOST=wallabag-db
      - SYMFONY__ENV__DATABASE_PORT=3306
      - SYMFONY__ENV__DATABASE_NAME=wallabag
      - SYMFONY__ENV__DATABASE_USER=xxxx
      - SYMFONY__ENV__DATABASE_PASSWORD=xxxx
      - SYMFONY__ENV__DATABASE_CHARSET=utf8mb4
      - SYMFONY__ENV__DATABASE_TABLE_PREFIX="wallabag_"
      - SYMFONY__ENV__MAILER_DSN=smtp://127.0.0.1
      - SYMFONY__ENV__FROM_EMAIL=wallabag@example.com
      - SYMFONY__ENV__DOMAIN_NAME=https://wallabag.xxx
      - SYMFONY__ENV__SERVER_NAME="xxx"
    volumes:
      - ./images:/var/www/wallabag/web/assets/images
    healthcheck:
      test: ["CMD", "wget" ,"--no-verbose", "--tries=1", "--spider", "http://localhost"]
      interval: 1m
      timeout: 3s
    depends_on:
      - db
      - redis

  db:
    image: mariadb:10.8.2
    container_name: wallabag-db
    restart: always
    networks:
      - default
    environment:
      - MYSQL_ROOT_PASSWORD=xxxx
    volumes:
      - ./data:/var/lib/mysql
    healthcheck:
      test: ["CMD", "mysqladmin" ,"ping", "-h", "localhost"]
      interval: 20s
      timeout: 3s

  redis:
    image: redis:alpine
    restart: always
    networks:
      - default
    container_name: wallabag-redis
    healthcheck:
      test: ["CMD", "redis-cli", "ping"]
      interval: 20s
      timeout: 3s

networks:
  rproxy:
    external:
      name: rproxy-network
MediaWiki §
I use Mediawiki mainly for note-taking. While there might be better solutions, it works reasonably well for me.
Here is the docker-compose.yaml:
version: '3'
services:
  mediawiki:
    image: mediawiki:1.39.5
    container_name: mediawiki
    restart: always
    links:
      - database
    volumes:
      # make sure this directory is writable
      - ./images/:/var/www/html/images
      - ./LocalSettings.php:/var/www/html/LocalSettings.php:ro
    networks:
      - default
      - rproxy
    security_opt:
      - seccomp:unconfined # wiki needs online services to render latex

  database:
    image: mariadb:10.8.2
    container_name: mediawiki-db
    restart: always
    volumes:
      - ./db/:/var/lib/mysql
    environment:
      MYSQL_DATABASE: my_wiki
      MYSQL_USER: wikiuser
      MYSQL_PASSWORD: xxxxx
      MYSQL_RANDOM_ROOT_PASSWORD: 'yes'
    networks:
      - default

networks:
  rproxy:
    external:
      name: rproxy-network
Seccomp is a security feature of the Linux kernel that disables certain system calls for containers.
Unfortunately, some containers seem to require some of these syscalls.
The option seccomp:unconfined disables seccomp entirely.
KiWix §
KiWix is an offline browser that stores entire websites for offline use. This way, you can use Wikipedia or Stack-Overflow even if you have no internet.
/mnt/.version: '3'
services:
kiwix:
container_name: kiwix-serve
image: ghcr.io/kiwix/kiwix-serve
networks:
- rproxy
command: '*.zim'
volumes:
- "/mnt/app-data/kiwix:/data"
networks:
rproxy:
external:
name: rproxy-network
Offline websites are saved in so-called zim archive files.
Since these can be quite large (for me, the files amount to 246GB), I keep them on the network-attached storage. These are the zim files I have stored for offline use:
user@machine:~/$ ls -lh /mnt/app-data/kiwix/
total 246G
-rw-rw---- 1 user user  29M Dec 16  2022 archlinux_en_all_maxi_2022-12.zim
-rw-rw---- 1 user user 115M May 16  2024 cooking.stackexchange.com_en_all_2024-05.zim
-rw-rw---- 1 user user 3.6G Oct  9 10:48 docs.python.org_en_2024-10.zim
-rw-rw---- 1 user user  70M Mar 20  2021 gentoo_en_all_maxi_2021-03.zim
-rw-rw---- 1 user user 2.7G Mar  8  2024 gutenberg_de_all_2023-08.zim
-rw-rw---- 1 user user 5.9M Aug 10 01:57 mspeekenbrink_en_all_2024-08.zim
-rw-rw---- 1 user user 112M Mar 10  2021 rationalwiki_en_all_maxi_2021-03.zim
-rw-rw---- 1 user user  75G Dec  1  2023 stackoverflow.com_en_all_2023-11.zim
-rw-rw---- 1 user user  74G Jul 18 10:09 ted_mul_all_2024-07.zim
-rw-rw---- 1 user user  28M May  7  2024 tor.stackexchange.com_en_all_2024-05.zim
-rw-rw---- 1 user user 103G Jan 21  2024 wikipedia_en_all_maxi_2024-01.zim
I could imagine that, in the future, it might be possible to use such offline files as a basis for RAG systems.
Logging & Monitoring §
For historical reasons, I have a dedicated VM for logging and monitoring purposes. It lives on the main LAN, and access is managed via firewall.
- OS: Ubuntu 22.04
- CPUs: 2 vCores
- RAM: 2GB
- Disk: 64GB Thin Disk
- NIC: single VirtIO (paravirtualized) connected to the main LAN
Applications §
The VM runs the TIG stack:
- Telegraf: monitoring, sends measurements to the database
- InfluxDB: time series database that works well with Telegraf
- Grafana: visualization dashboard for InfluxDB data
- Watchtower
- Nginx-Proxy-Manager
The Influx database stores everything on the VM disk. After close to 2 years of constant operation, it has written around 30GB of data.

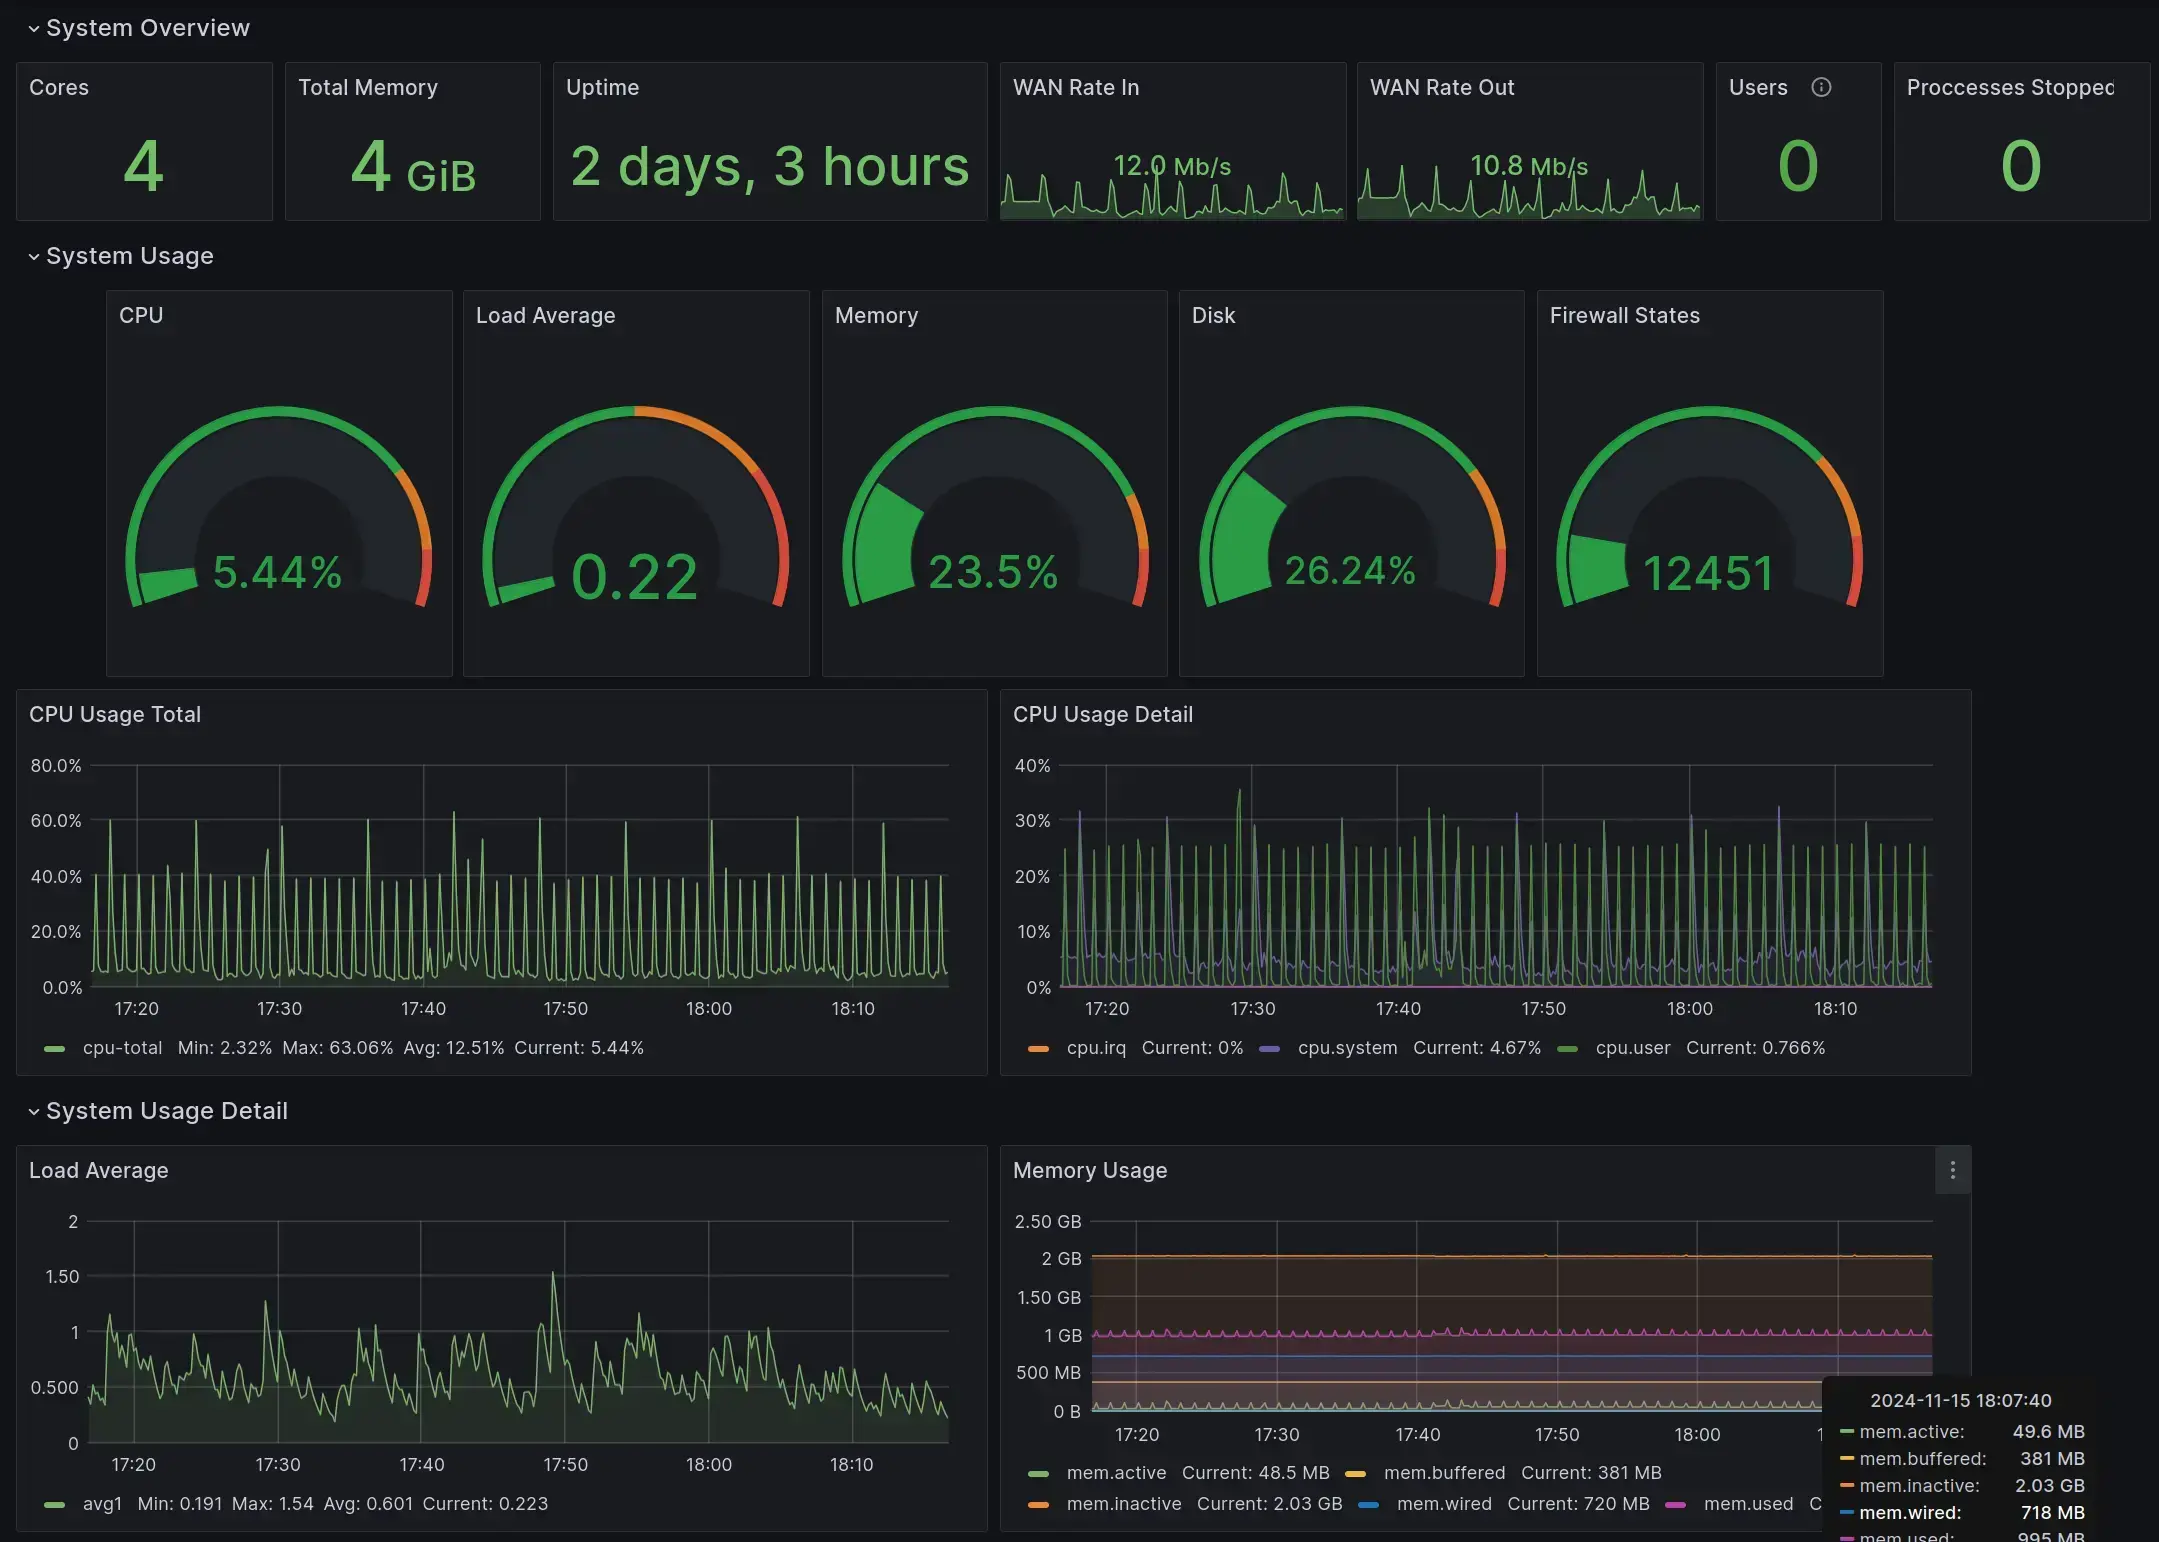
Example of Grafana UI for monitoring my Router
External Services §
On this VM, I run everything that is reachable from the outside world.
- OS: Debian 12
- CPUs: 4 vCores
- RAM: 16GB
- NIC: single VirtIO (paravirtualized) connected to External VLAN
Applications §
- Portainer Agent
- Nextcloud
- Nginx (3x)
- Nginx-Proxy-Manager
- Gitlab CE
- Docker Registry
- Transmission: torrent client, in my case, mainly seeding Linux ISOs
- Telegraf
- Watchtower
Nextcloud §
Nextcloud is a self-hosted cloud service that can store files, contact information, as well as calendars. Basically, it acts as a replacement for Google Drive, Dropbox, or similar services that you pay for one way or another.
The service requires a cronjob to run at regular intervals to do some housekeeping in the background. If you do not run these tasks, old access tokens, for example, will never be invalidated automatically. Also, I had some problems with files being locked. These problems could be resolved manually, but this is quite tedious. The solution I am using here - running an additional container with this cronjob - is taken from here.
/home/user/docker/netxcloud/nextcloud-data/. User id must be 33.version: '3'
services:
nextcloud-db:
image: mariadb:11.2.3
container_name: nextcloud-db
restart: always
# see https://github.com/nextcloud/server/issues/25436
command: |
--transaction-isolation=READ-COMMITTED
--binlog-format=ROW
--skip-innodb-read-only-compressed
networks:
- default
volumes:
- ./mysql/:/var/lib/mysql
environment:
- MYSQL_ROOT_PASSWORD=xxxx
- MYSQL_PASSWORD=xxxx
- MYSQL_DATABASE=xxxx
- MYSQL_USER=xxxx
nextcloud:
image: nextcloud:latest
container_name: nextcloud
volumes:
- ./nextcloud/:/var/www/html
- ./nextcloud-data:/var/www/html/data
restart: always
depends_on:
- nextcloud-db
environment:
- NEXTCLOUD_ADMIN_USER=xxxx
- NEXTCLOUD_ADMIN_PASSWORD=xxxx
- MYSQL_DATABASE=nextcloud
- MYSQL_USER=xxxx
- MYSQL_PASSWORD=xxxx
- MYSQL_HOST=nextcloud-db
- VIRTUAL_HOST=xxxx
networks:
- rproxy
- default
# taken from https://blog.networkprofile.org/vms-and-containers-i-am-running-2023/
cron:
image: nextcloud:latest
container_name: nextcloud-cron
restart: unless-stopped
volumes:
- ./nextcloud/:/var/www/html
- ./nextcloud-data/:/var/www/html/data
entrypoint: /cron.sh
depends_on:
- nextcloud-db
networks:
- default
networks:
rproxy:
external:
name: rproxy-network
GPU Server §
I have a VM with a GPU that is passed through from the physical host. This VM runs all of the containers that can benefit from hardware acceleration. Additionally, as the GPU has HDMI outputs, I can connect this VM to a TV. This way, I do not have to power up my personal computer if I just need a desktop or want to watch a movie.
- OS: Debian 12
- CPU: 6 vCores
- RAM 16GB
- Storage: 32GB Thin Disk
- GPU: Nvidia 1060 (6GB VRAM)
- NIC: single VirtIO (paravirtualized) connected to External VLAN
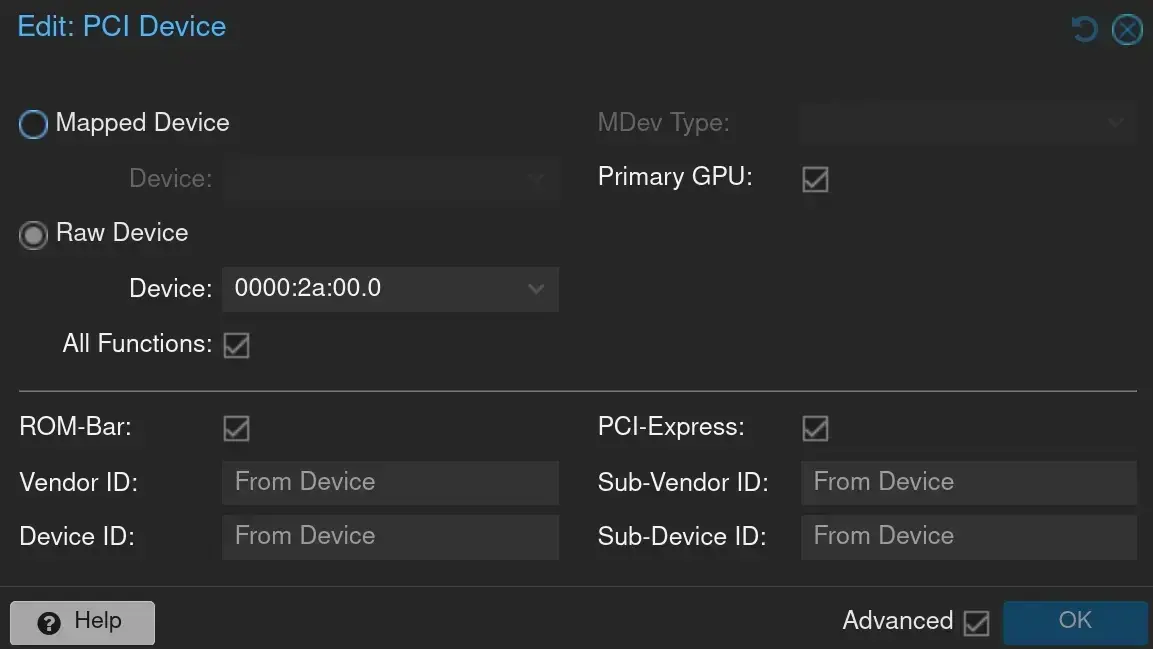
Setting up PCIe passthrough in Proxmox was quite tricky. There are several guides that help you to configure your system. In Proxmox, it looks as follows:

GPU passthrough in Proxmox
However, in my case, I had to additionally
- add
video=efifb:offto the kernel parameters of the Proxmox host - use UEFI for the VM to enable the primary GPU option in Proxmox
- disable secure boot in the VM
- set the VMs CPU model to
host
Afterward, you will have to install the nvidia-container-toolkit so that the docker containers can work with the GPU.
Applications
- Jellyfin
- Ollama
- Watchtower
Jellyfin §
I possess quite an extensive and ever-growing media collection. Jellyfin is an open-source media server that allows you to access your media files over a nice web interface that looks similar to Netflix, Spotify, etc. Jellyfin can use the GPU to accelerate media transcoding.
There are also some well-maintained mobile clients, such as Finamp, which you can use as a replacement for Spotify on your phone.
/mnt/.version: "3.5"
services:
jellyfin:
image: linuxserver/jellyfin
container_name: jellyfin
ports:
- 80:8096
- 443:8920
volumes:
- ./config:/config
- /mnt/media/Video:/media/Video
- /mnt/media/Music:/media/Music
environment:
- PUID=1000
- PGID=1000
- NVIDIA_DRIVER_CAPABILITIES=all
- NVIDIA_VISIBLE_DEVICES=all
- JELLYFIN_PublishedServerUrl=xxxx
restart: "unless-stopped"
deploy:
resources:
reservations:
devices:
- driver: nvidia
count: 1
capabilities: [gpu]
Ollama §
Ollama allows you to run LLMs locally with GPU acceleration via CUDA. The models are then served via an API, which can be neatly integrated with several other projects. Currently, the LLMs weights are stored on the NAS, which drastically increases the latency for the first request (since the model has to be loaded into the RAM over the network). However, many of the models are just too large for the VM disk.
/mnt/.version: '3'
services:
ollama:
image: ollama/ollama
container_name: ollama
ports:
- "11434:11434"
volumes:
- /mnt/app-data/ollama:/root/.ollama
restart: "unless-stopped"
environment:
- OLLAMA_KEEP_ALIVE="60m"
- OLLAMA_LOAD_TIMEOUT="60m"
deploy:
resources:
reservations:
devices:
- driver: nvidia
count: 1
capabilities: [gpu]
Home Assistant §
Home Assistant is a very good open source home automation platform. They also provide a VM disk image that can be imported to set everyting up with minimal effort.
- OS: Home Assistant OS
- CPU: 4 vCore
- RAM: 4GB
- Storage: 32GB Thin Disk
- NIC: single VirtIO (paravirtualized) connected to IoT VLAN
Tor Relay §
After reading Permanent Record by Snowden, I decided to donate some of my bandwidth to the Tor network. I configured the server to not run as an exit node, otherwise, my IP address would find its way on some blacklists, and there might even be legal ramifications. Rather, the software acts as a relay, transferring messages from one tor node to another.
- CPU: 1 vCore
- RAM: 1GB
- Storage: 32GB Thin Disk
- NIC: single VirtIO (paravirtualized) connected to External VLAN
For security reasons, the tor relay runs in its own VM, in the “external services” VLAN, so that it is isolated from most other systems in the network.
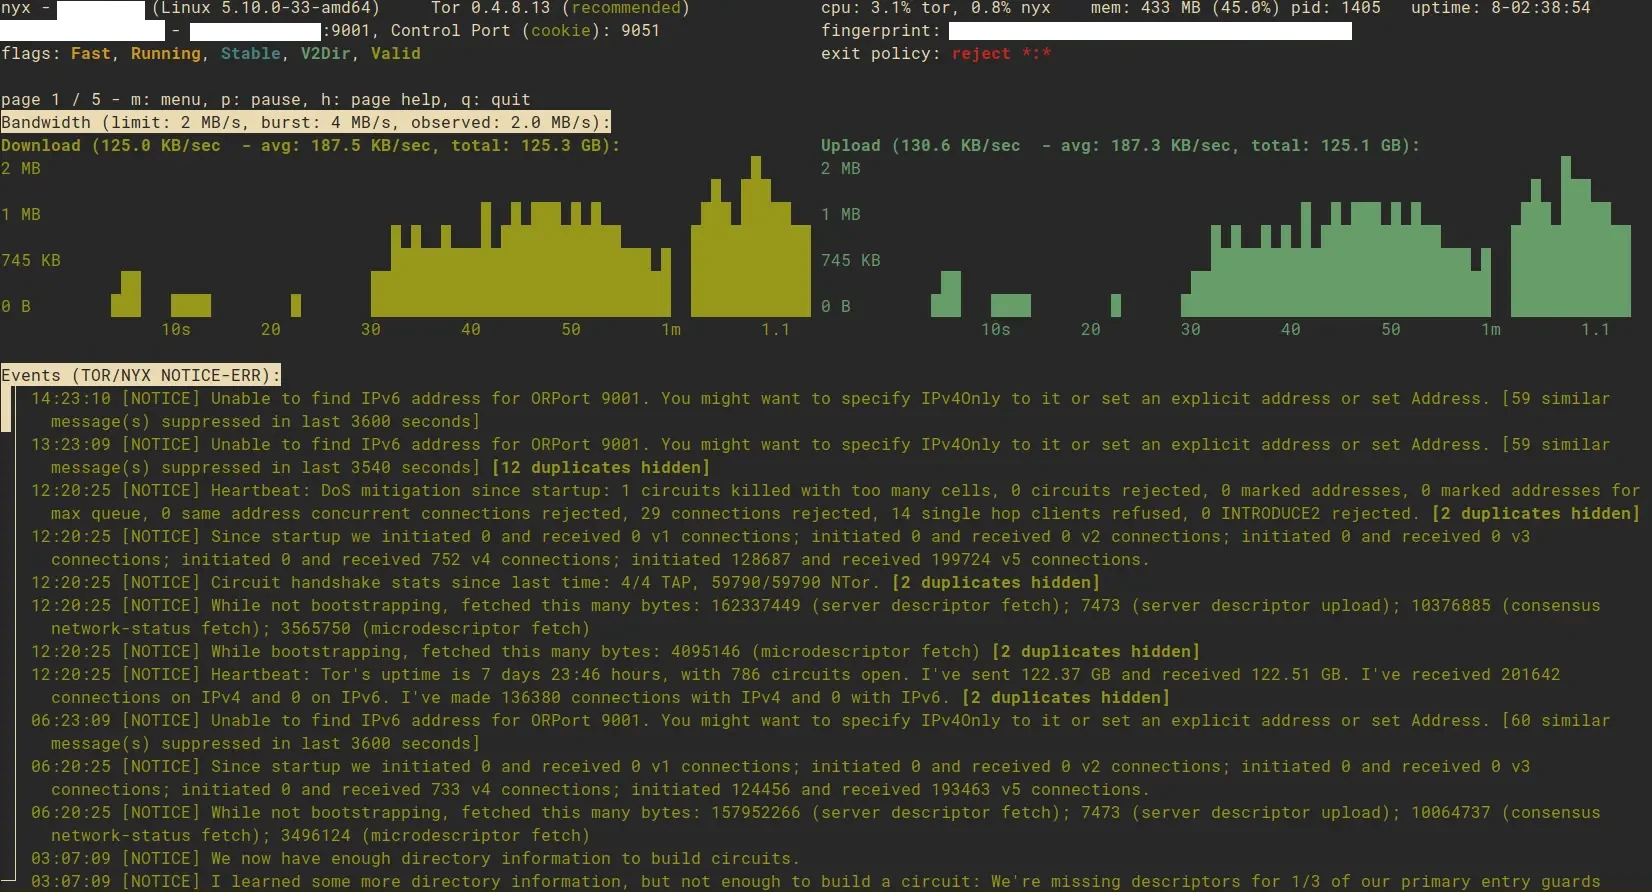
Over the last year, the node has transferred several terabytes of data.

Screenshot of the tor node monitoring software Nyx.